SpringBoot---整合MyBatis Generator
前言
数据库操作是一个项目不可缺少的一部分,工欲善其事必先利其器,一个好的工具会让整个开发效率翻倍,本文介绍SpringBoot通过MyBatis Generator快速整合MyBatis对Mysql的操作。
源码地址
本文基于以下文章开发:
SpringBoot学习之旅(一)---基础项目搭建
准备工作
Pom.xml资源引入
-
内库导入
在pom.xml中添加以下Maven库<!--java的mysql连接客户端--> <dependency> <groupId>mysql</groupId> <artifactId>mysql-connector-java</artifactId> <version>5.1.41</version> </dependency> <!--使用阿里巴巴的druid的mysql连接池--> <dependency> <groupId>com.alibaba</groupId> <artifactId>druid-spring-boot-starter</artifactId> <version>1.1.10</version> </dependency> <!--mybatis对spring boot的支持--> <dependency> <groupId>org.mybatis.spring.boot</groupId> <artifactId>mybatis-spring-boot-starter</artifactId> <version>1.3.1</version> </dependency> -
generator plugin 配置
将以下配置添加到pom.xml的plugins节点下<!--mybatis 自动生成的插件--> <plugin> <groupId>org.mybatis.generator</groupId> <artifactId>mybatis-generator-maven-plugin</artifactId> <version>1.3.5</version> <dependencies> <dependency> <groupId>org.mybatis.generator</groupId> <artifactId>mybatis-generator-core</artifactId> <version>1.3.5</version> </dependency> <dependency> <groupId>mysql</groupId> <artifactId>mysql-connector-java</artifactId> <version>5.1.41</version> </dependency> </dependencies> <executions> <execution> <id>mybatis generator</id> <phase>package</phase> <goals> <goal>generate</goal> </goals> </execution> </executions> <configuration> <!--允许移动生成文件,默认是不允许的--> <verbose>true</verbose> <!--允许自动覆盖,默认不覆盖,实际的项目开发中不配置这段--> <overwrite>true</overwrite> <!--mybatis generator 配置文件的路径--> <configurationFile> src/main/resources/mybatis-generator.xml </configurationFile> </configuration> </plugin>- pom下配置resources配置路径扫描配置
        <resources>
            <resource>
                <directory>src/main/resources</directory>
                <includes>
                    <include>**/*.yml</include>
                    <include>**/*.xml</include>
                </includes>
            </resource>
        </resources>
资源目录创建
分别在以下路径下创建对应的
-
src/main/java
- dao
用于存放Mybatis的Dao - dataobject
用于存放数据库的实提对象,这里的字段是和数据库表的字段一一关联,不存在任何业务逻辑参与其中
- dao
-
src/main/resources
- mapping
存放数据库映射关系的mapping文件
- mapping
数据库及表创建
这里模拟用户相关信息
创建一个test的数据库,并创建一个用户表及用户密码表
以下是创建表的脚本
DROP TABLE IF EXISTS `user_info`;
CREATE TABLE `user_info` (
  `id` int(11) NOT NULL AUTO_INCREMENT,
  `name` varchar(50) NOT NULL DEFAULT '' COMMENT '用户名(昵称)',
  `sex` tinyint(4) NOT NULL DEFAULT '2' COMMENT '性别  0:女 1:男 2:未知',
  `age` int(11) NOT NULL DEFAULT '0',
  `telphone` varchar(15) DEFAULT NULL COMMENT '手机号码(唯一键),null数据是不受唯一键约束的,防止用户是使用三方登录的',
  `email` varchar(20) NOT NULL DEFAULT '' COMMENT '用户的邮箱',
  `register_mode` varchar(20) NOT NULL DEFAULT '' COMMENT '注册方式:手机号、微信注册、支付宝',
  `third_party_id` varchar(64) NOT NULL DEFAULT '' COMMENT '第三方的id',
  `avatar` varchar(50) NOT NULL DEFAULT '' COMMENT '用户头像',
  PRIMARY KEY (`id`),
  UNIQUE KEY `电话号码唯一` (`telphone`) USING HASH
) ENGINE=InnoDB AUTO_INCREMENT=18 DEFAULT CHARSET=utf8;

DROP TABLE IF EXISTS `user_password`;
CREATE TABLE `user_password` (
  `id` int(11) NOT NULL AUTO_INCREMENT COMMENT '索引ID',
  `encrpt_password` varchar(256) NOT NULL COMMENT '加密的密码',
  `user_id` int(11) NOT NULL COMMENT '关联的用户id',
  PRIMARY KEY (`id`)
) ENGINE=InnoDB AUTO_INCREMENT=10 DEFAULT CHARSET=utf8;
generator配置
配置mybatis-generator.xml
在src/main/resources目录下创建mybatis-generator.xml,并添加以下配置
<?xml version="1.0" encoding="UTF-8" ?>
<!DOCTYPE generatorConfiguration PUBLIC
        "-//mybatis.org//DTD MyBatis Generator Configuration 1.0//EN"
        "http://mybatis.org/dtd/mybatis-generator-config_1_0.dtd" >
<generatorConfiguration>

    <!--id为上下文ID,可自行定义-->
    <context id="Generator" targetRuntime="MyBatis3">

        <!-- 数据库的相关配置 -->
        <jdbcConnection driverClass="com.mysql.jdbc.Driver" connectionURL="jdbc:mysql://127.0.0.1:3306/test"
                        userId="root" password="123456"/>

        <!-- 数据库对象生成之后存放位置 -->
        <!-- 这里的路径根据自己项目的情况修改 -->
        <javaModelGenerator targetPackage="com.lupf.springboottest.dataobject" targetProject="src/main/java">
            <property name="enableSubPackages" value="false"/>
            <property name="trimStrings" value="true"/>
        </javaModelGenerator>

        <!-- mapping映射文件的位置 -->
        <!-- 这里的路径根据自己项目的情况修改 -->
        <sqlMapGenerator targetPackage="mapping" targetProject="src/main/resources">
            <property name="enableSubPackages" value="false"/>
        </sqlMapGenerator>

        <!-- mapping接口文件的位置(dao接口) -->
        <!-- 这里的路径根据自己项目的情况修改 -->
        <javaClientGenerator targetPackage="com.lupf.springboottest.dao" targetProject="src/main/java" type="XMLMAPPER">
            <property name="enableSubPackages" value="false"/>
        </javaClientGenerator>

        <!-- 相关表的配置 -->
        <table tableName="user_info" domainObjectName="UserDO" enableCountByExample="false"
               enableDeleteByExample="false" enableSelectByExample="false"
               enableUpdateByExample="false"/>
        <table tableName="user_password" domainObjectName="UserPasswordDO" enableCountByExample="false"
               enableDeleteByExample="false" enableSelectByExample="false"
               enableUpdateByExample="false"/>
    </context>
</generatorConfiguration>
配置application.yml
添加以下配置,指定spring要扫描的MyBatis的mapper的路径
spring:
  application:
    name: spring-boot-test
  #数据库连接相关配置
  datasource:
    url: jdbc:mysql://127.0.0.1:3306/test?useSSL=false&serverTimezone=UTC
    username: root
    password: 123456
    #阿里巴巴的druid的mysql连接池
    type: com.alibaba.druid.pool.DruidDataSource
    driver-class-name: com.mysql.jdbc.Driver

#mybatis mapper路径配置
mybatis:
  mapperLocations: classpath:mapping/*.xml
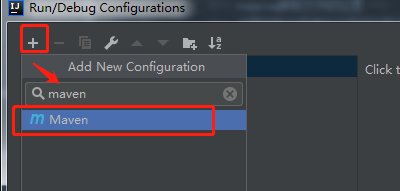
运行generator
- 添加generator的运行文件

配置generator的运行路径
- 运行generator


到处,即自动生成了相关的实体对象及配置文件,同时会一并生成基础的增删改查相关的操作,大大减少了基础配置相关的体力活。
错误解决
-
错误一
Could not find artifact org.eclipse.m2e:lifecycle-mapping:pom:1.0.0 in central (https://repo.maven.apache.org/maven2)
- 解决
// 1、github下载dummy-lifecycle-mapping-plugin
git clone https://github.com/mfriedenhagen/dummy-lifecycle-mapping-plugin

// 2、在拉下来的项目文件夹里执行下面指令,这样就可以把lifecycle-mapping拉到本地maven仓库了
mvn -Dmaven.test.skip -U clean install

// 3、重新运行generator
run mybatis-generator.xml
- 解决
配置项目启动类
找到启动类SpringBootTestApplication,按以下方式配好配置,具体的路径请根据个人项目进行调整
//指定springBoot扫描的整个项目的父路径,即为在改路径下的所有方法将都会被扫描注入
@SpringBootApplication(scanBasePackages = {"com.lupf.springboottest"})
//指定当前项目为Eureka客户端
@EnableEurekaClient
//mybatis mapper扫描的dao路径
@MapperScan("com.lupf.springboottest.dao")
public class SpringBootTestApplication {
    public static void main(String[] args) {
        SpringApplication.run(SpringBootTestApplication.class, args);
    }
}
测试
- 简单的功能性测试
在SpringBootTestApplication 下配置controller并实现MyBatis的读取测试,配置如下://指定springBoot扫描的整个项目的父路径,即为在改路径下的所有方法将都会被扫描注入 @SpringBootApplication(scanBasePackages = {"com.lupf.springboottest"}) //指定当前项目为Eureka客户端 @EnableEurekaClient //mybatis mapper扫描的dao路径 @MapperScan("com.lupf.springboottest.dao") //指明当前类为一个controller @RestController public class SpringBootTestApplication { public static void main(String[] args) { SpringApplication.run(SpringBootTestApplication.class, args); } @Autowired UserDOMapper userDOMapper; @RequestMapping("/hello") public Object getUserById() { //根据用户id获取数据库的用户信息 //这里的操作仅仅作为测试使用,真正的项目中并不是使用此方式操作 UserDO userDO = userDOMapper.selectByPrimaryKey(1); return userDO; } } - postMan测试效果如下
数据为手动插入的用户数据
- 业务流程测试
MVC模式使用Mybatis操作MySql的业务流程开发,可参考SpringBoot学习之旅---MVC设计模式
druid连接池及监控统计
druid配置
application.yml下调整mysql的配置如下:
spring:
  application:
    name: spring-boot-test
  #数据库连接相关配置
  datasource:
    url: jdbc:mysql://192.168.1.208:3307/test?useSSL=false&serverTimezone=UTC
    username: root
    password: 123456
    #阿里巴巴的druid的mysql连接池
    type: com.alibaba.druid.pool.DruidDataSource
    driver-class-name: com.mysql.jdbc.Driver
    druid:
      #连接池的配置信息
      #初始化大小,最小,最大
      initial-size: 5
      min-idle: 5
      maxActive:  20
      #配置获取连接等待超时的时间
      maxWait:  60000
      #配置间隔多久才进行一次检测,检测需要关闭的空闲连接,单位是毫秒
      timeBetweenEvictionRunsMillis:  60000
      #配置一个连接在池中最小生存的时间,单位是毫秒
      minEvictableIdleTimeMillis: 300000
      validationQuery:  SELECT 1 FROM DUAL
      testWhileIdle:  true
      testOnBorrow: false
      testOnReturn: false
      #打开PSCache,并且指定每个连接上PSCache的大小
      poolPreparedStatements: true
      maxPoolPreparedStatementPerConnectionSize:  20
      #配置监控统计拦截的filters,去掉后监控界面sql无法统计,'wall'用于防火墙
#      filters: stat,wall,log4j
      #通过connectProperties属性来打开mergeSql功能;慢SQL记录
      connectionProperties: druid.stat.mergeSql=true;druid.stat.slowSqlMillis=5000
      #配置DruidStatFilter
      web-stat-filter:
        enabled:  true
        url-pattern:  "/*"
        exclusions: "*.js,*.gif,*.jpg,*.bmp,*.png,*.css,*.ico,/druid/*"
      #配置DruidStatViewServlet
      stat-view-servlet:
        url-pattern:  "/druid/*"
        #IP白名单(没有配置或者为空,则允许所有访问)
        allow:  127.0.0.1,192.168.1.123
        #IP黑名单(存在共同时,deny优先于allow)
        deny: 192.168.1.124
        #禁用HTML页面上的“ResetAll”功能
        reset-enable: false
        #登录名
        login-username: admin
        #登录密码
        login-password: 123456
durid监控页面查看
本地浏览器输入:http://127.0.0.1:8082/druid/login.html
使用上面配置的用户名、密码登录即可进入数据库的监控管理界面


标题:SpringBoot---整合MyBatis Generator
作者:码霸霸
地址:https://blog.lupf.cn/articles/2020/12/05/1607176425054.html
 IDEA
IDEA
 Java
Java
 SpringBoot
 面试题
面试题
 工具
工具
 程序员导航
程序员导航
 JDK
JDK


